Servicing the half shafts can involve repacking the grease to prolong their life or replacing the Constant Velocity (CV) joints and/or Tripods joints that have worn out.
Symptoms of a failing CV or Tripod joint including having excessive play or noise when operating. Replacing the grease in the half shafts is part of the maintenance program to help prolong the life of these units and prevent failures at the track. It can also reduce the cost of having to buy replacement joints.
To service/repair the SCCA Spec Racer Ford half shafts you will need a few simple tools and some high quality grease. I like to perform this preventative maintenance at the end of the season. Unless you are doing lots of events and then you could do it halfway through the season as well.
Tools & Equipment
Paper Towels / Rags
Clean Disposable Gloves
Degreaser / Brake Cleaner
CV-2 Redline grease (or your favorite high temp bearing grease)
Light Hammer or Rubber Mallet
Large and Medium Screwdriver
Safety Wire and Pliers
Side Cutters
Bench Vise
Tripod Grease Tool (optional)
Impact ~150ft-lb for 30mm axle nut
30mm deep socket for axle nut
11/16, 3/4, 15/16 inch Wrench / Spanners
10mm, 19mm, 3/4, 15/16 inch Deep Sockets
3/8 inch Drive Ratchet (and breaker bar)
Impact Driver (optional)
Clean Bench
Drip Tray
Magnetic Parts Tray (optional)
Gearbox oil (I use Redline MT-90)
Gearbox Plug (optional)
Outer CV Joint Assembly - SCCA Enterprise PN: 398201
Tripod Assembly - SCCA Enterprise PN: 398113
Half Shaft Removal
Loosen the rear lug nuts using a 19mm socket and ratchet or breaker bar.
Jack up the car (you want to jack on one side of the chassis to tilt the gearbox as much as possible to avoid gearbox oil loss). Alternatively you can use a plug that goes into the transmission to avoid any leakage.
Place a drip tray under the gearbox incase you loose gear oil.
Use the impact driver with 19mm deep socket to remove the lug nuts. Remove the wheel and place out of the way. I use magnetic parts trays to keep all the lug nuts and other fasteners in one place.
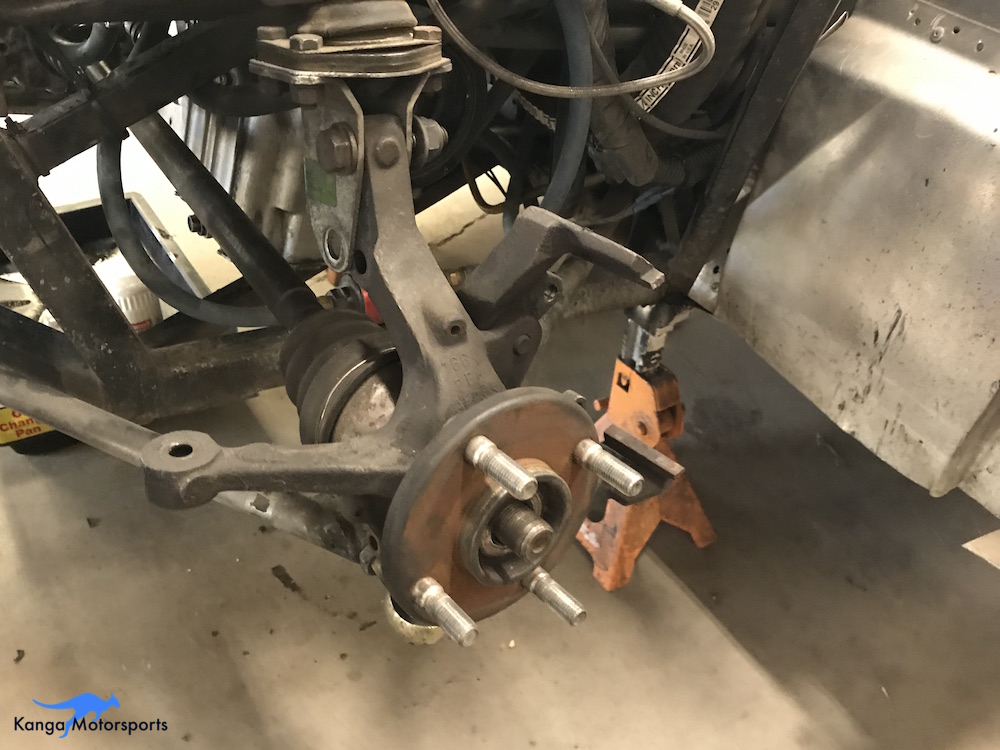
Using an 10mm socket and 3/8th drive ratchet remove the two bolts holding the brake caliper in place. I tend to place it up on the frame out of the way. Then slide the rotor off to gain access to the upright.
Use the 30mm deep socket to remove the axle nut and washer. You can use a big breaker bar but it is a lot easier with an impact driver (rated for at least 150 ft-lb).
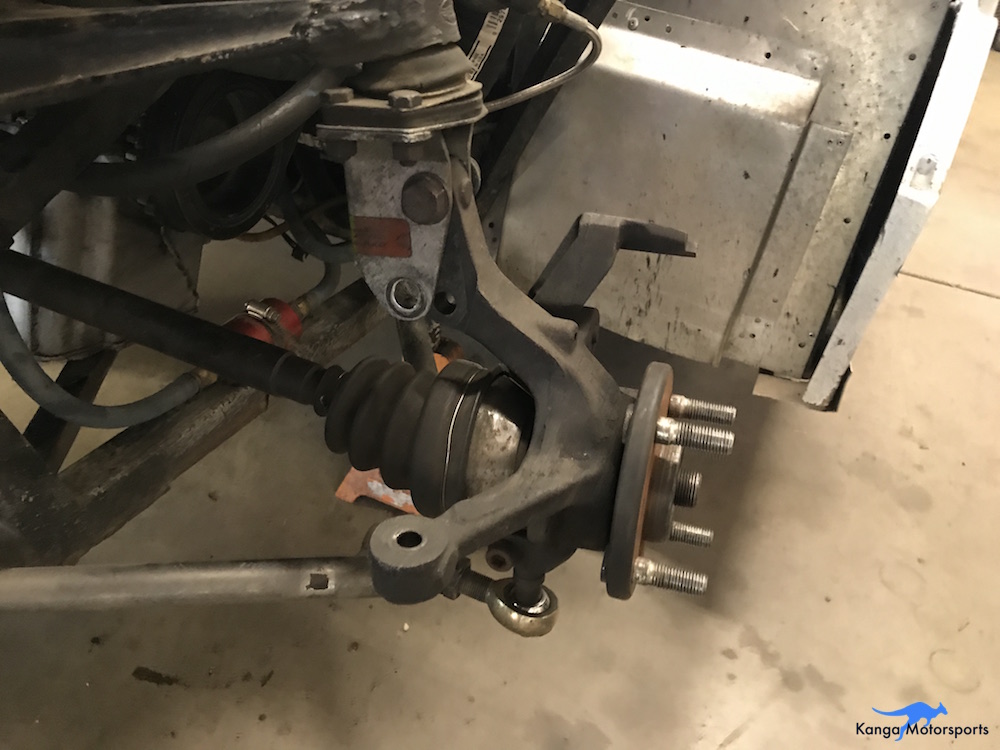
Loosen the Upper Ball Joint bracket upper bolt and remove the lower bolt using the 3/4 inch wrench, socket and ratchet. If you have an impact driver it can also speed up the process here.
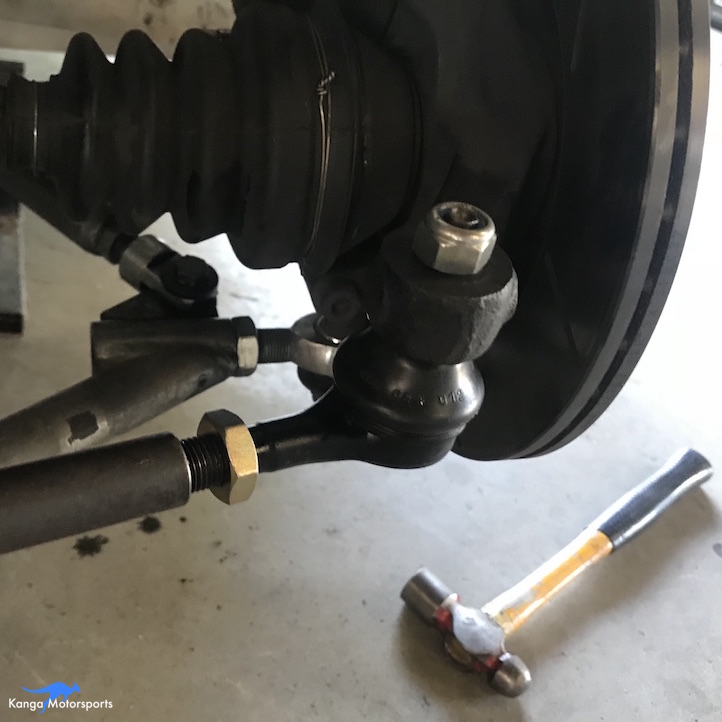
Use the 11/16th wrench to brake loose the tie rod nut, I have. Don't remove the nut just yet. Lightly tap the unit to unseat it. Don't smack the threads as you can ruin the whole unit. I have seen various sizes on the nut outer dimension so you might need a different wrench.
Remove the R-clip/cotter pin from the lower control arm. Undo the castle nut with 3/4 spanner or socket and ratchet. Drop the lower control arm out of the way.
Now you should be able to lift up the upright and remove the splined axle from the center of the hub.
Using a large screw driver and light hammer very carefully loosen the axle from the gear box using the screw driver as a wedge and lightly tapping be careful not to mark any machined surfaces or damage the seals (there is a snap ring that prevents it form just being pull out)
As you remove the half shaft from the transmission insert the plug to minimize the amount of gearbox oil lost.
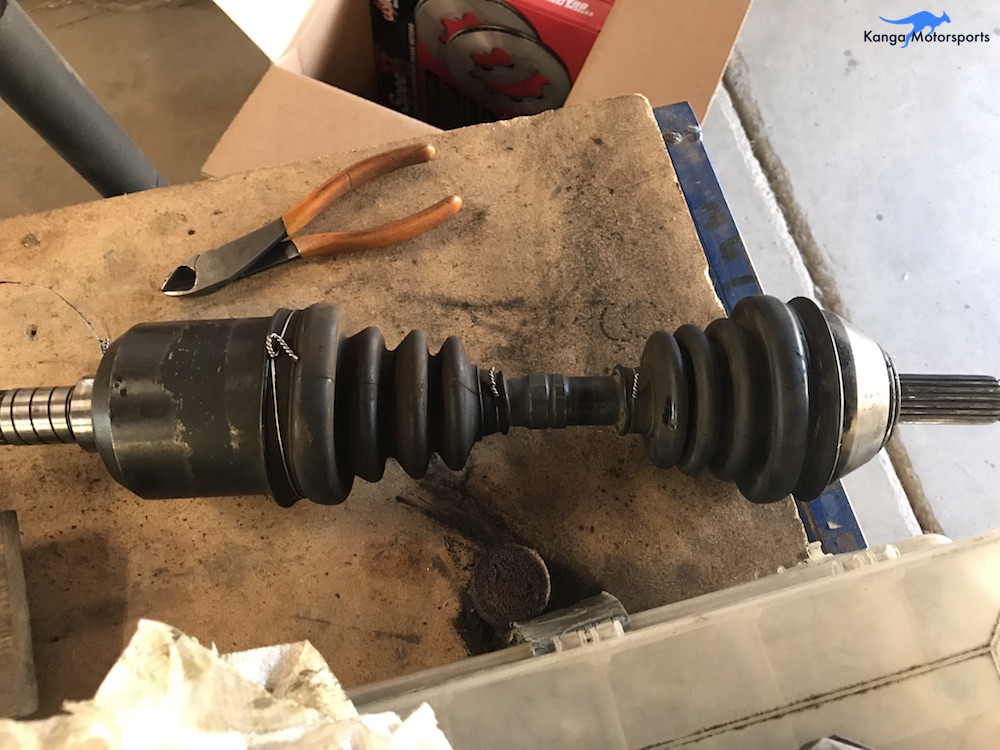
Removal of the half shaft is now complete and you can place it on a bench or optionally in a vice to keep it steady during disassembly.
Tripod Joint Servicing
Using side cutters remove the clips or safety wire around the Tripod dust boot
Peel back the Tripod dust boot and clean out any old excess grease.
Remove the Tripod cup and clean out the old grease. Inspect the Tripod cup for wear, damage or burrs. A small amount of light wear is expected for the transmission engagement direction. If there is excessive wear you should replace the tripod cup. SCCA Enterprises has replacement assemblies.
Clean the excess old grease from around the Tripod roller bearings.
Inspect the Tripod roller bearings for wear or damage and replace if needed.
Using either your hands or a Tripod Grease Tool lubricate the roller bearings by packing with new grease (make sure you get the grease all the way in there). The tool makes the job easier. Fill the cup area with fresh grease and squeeze it over the roller bearing it will push fresh grease through the needles. As the new grease enters it will push out the old grease which you can wipe away with a rag or paper towel. Continue until all the old grease is gone and fresh grease starts to come out. Repeat for each of the three roller bearings subassemblies.
Spread new grease on the splines and outer surfaces of the roller case
Spread new grease on the inside Tripod cup contact surfaces
Insert the Tripod into the Tripod cup.
Place the Tripod dust boot back into place over the cup.
Safety wire the Tripod dust boot back into place making sure the wire is tight and the boot is correctly positioned over the detent in the outer surface of the tripod cup. Don't tighten too far and cut into the boot but make sure it is snug so it doesn't leak.
CV Joint Servicing
Using side cutters remove the clips or safety wire around the CV joint dust boot
Insert the half shaft into a bench top vice to keep it steady
Peel back the CV joint dust boot and clean out old grease
Remove the CV joint from the drive shaft splines
The lock ring might be difficult to remove this can be done very carefully using a medium screw driver and light hammer taps be very careful not to damage the CV parts, races or ball bearings.
The trick is to select the correct size screw driver to wedge the retaining clip open. Sometimes you get it first go, sometimes it takes a few tries. Be patient if it is your first time and you will get the hang of it.
With the CV joint removed clean out the old grease from the rubber boot and inspect for rips or tears in the boot. Also check the condition of the splines.
With the CV removed clean out any old excess grease. Here you can see it is very crusty and old grease, definitely a good time to service.
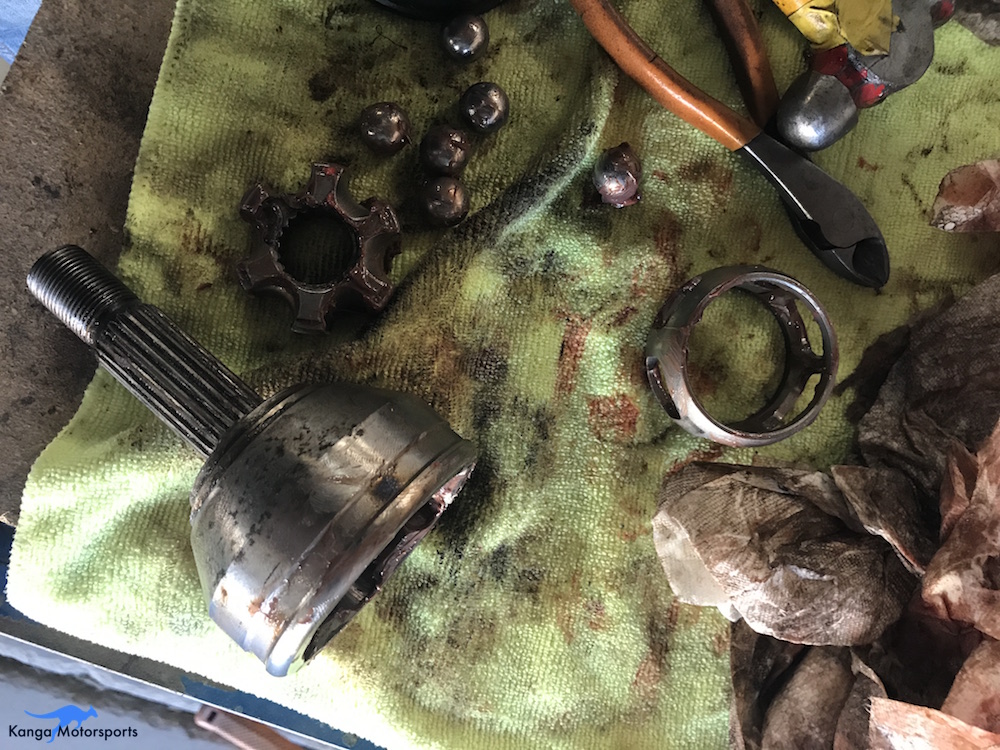
Begin the disassembly process by removing the ball bearings and placing them on a clean towel on the bench top. The towel helps to soak up old grease and prevent the ball bearings from rolling onto the floor.
As you remove the ball bearings you should be able to remove the inner race and cage.
Clean the ball bearings and inspect for wear and burrs.
Clean the old grease away from the inner race and inspect of wear and damage. You want to avoid any large gouges or grooves. A small light amount will be present. If you can't see easily, run your fingernail over the surface and see if it catches on any of the contact surfaces.
Here you can also see a close up view of the retaining clip you need to wedge open with the screwdriver to remove the CV joint.
Also inspect the ball bearing cage for wear and any cracks.
Make sure all the ball bearings, the race, cage and housing are all in good condition and clean before applying fresh grease and re-assembling. If they are worn out replace with new parts. Enterprises sells the CV as a complete assembly.
With the CV, inner & outer races and all ball bearings clean you are now ready to re-grease and reassemble.
The next steps are messy, I highly recommend using a fresh set of disposable gloves.
Using new high temperature grease re-install the inner race to the cage, coating each contact surface.
Insert the sub-assembly into the CV cup ensuring the snap ring is facing out. This is very important if you do it the wrong way you will not be able to get the snap ring to lock back in place.
One at a time slightly angle the cage and race to slip in a ball bearing coated in fresh grease.
Work around the CV one ball bearing at a time until all 6 ball bearings are back in their race. It can get a little tricky to get the last ball bearing in place but once you get used to it you will know just how much angle you need.
Pack the joint with new grease ensuring all contact surfaces, races and balls are well coated. The above picture shows too much grease and this will leak out as the unit gets too hot.
Put new grease on the splines and slide the CV back into place on the splines.
Ensure that the snap ring locks back in place on the shaft.
Place the CV dust boot back into place using the detent as a guide.
Safety wire the CV dust boot back into place ensuring it is tight to prevent grease escaping.
This completes the service of one half shaft with any necessary repairs made along the way. The half shaft axle can now be re-installed.
Reinstalling the Half Shaft
Reinsert the Tripod end into the gear box (it might require a few light taps with a rubber mallet to get pass the retaining ring). Make sure the shaft is all the way in and that you didn't damage the gear box seal.
Lift the Hub and slide the splined driveshaft into the upright through the wheel hub.
Replace the lower control arm tightening the castle nut with the 3/4inch wrench. Make sure to insert the R-clip/cotter pin and double check this.
Insert the tie rod and tighten the nut in place.
Replace the Upper Ball Joint bracket lower bolt.
Retighten and torque both Upper Ball Joint bracket bolts using the 3/4 inch wrench and socket.
Replace the axle nut and washer and hand tighten in place.
Reinstall the brake rotor and caliper. Insert the brake caliper pins and tighten in place with the 10mm socket and ratchet.
Replace the wheel and hand tighten the lug nuts.
Repeat the process with the other half shaft, removing, cleaning out, inspecting, replacing parts as needed, repacking with new grease and reinstalling.
Final Checks
With both drive shafts serviced and everything put back together. Time to get the Spec Racer Ford ready for the track.
Lower the car to the ground and off the jack stands.
Check that all nuts and bolts are tightened in place.
Torque the lug nuts to 55 ft-lb
Torque the axle nuts to 150ft-lb
Refill the gearbox with gear oil to make up for any that was lost.
Perform an alignment check to make sure your suspension set up didn't change in the process of disassembling the rear suspension.
After the first track session check for any grease spray or leaks from the half shafts boots and fix or replace the safety wire if grease is leaking out.










When replacing or refilling the Spec Racer Ford coolant system you need to make sure the all the air is bled out of the system before heading out on track.